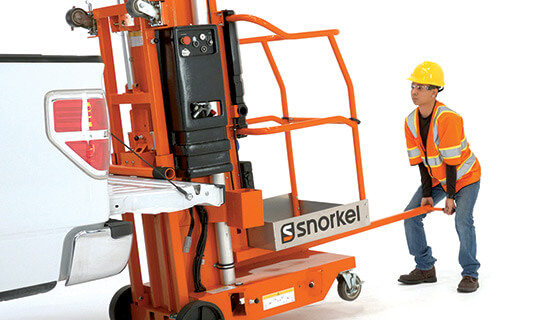
 Practicing safety on the job also applies to loading and unloading aerial lift equipment. The Snorkel line of UL push-around mast lifts is as easy to secure as it is to use. Follow this recommended guide for safe transporting in a few steps.
LOADING A SNORKEL UL
Note: For DC models, remove the battery, disconnect the battery box plug and secure for transport.
- Raise the loader support brackets and engage the retaining pin in the top hole of the loader channel.
- Secure the loader to the loader support bracket with the gravity hook.
- Position the back of the unit to make contact with the tailgate or vehicle bed.
- Release the gravity hook and slide the loader down until it comes into contact with the tailgate or vehicle bed. Reposition the loader support bracket so that the retaining pin is in the first available hole above the loader.
- Release the locking pin and pull the T-handle out until the locking pin engages the hole in the end of the T-handle.
- Lift up on the T-handle, using the loader as a pivot, until the unit rotates to a horizontal position in the vehicle bed.
- Push the base of the unit towards the front of the vehicle bed. The machine will slide on the loader until the rear wheels are on the bed. The unit may then be rolled on the rear wheels and upper casters.
- Return the T-handle to the stored position, making sure that the locking pin engages the T-handle.
- Secure the unit with suitable tie straps using the forklift pockets located under the base of the unit, AND
- Upper caster axle on the UL25 models
- Tilt back frame on the UL32 and UL40 models
UNLOADING A SNORKEL UL
- Unsecure the unit.
- Release the locking pin and pull the T-handle out until the locking pin engages the hole in the end of the T-handle.
- Roll the unit back until the rear wheels are off the edge of the tailgate or vehicle bed.
- Pull downward on the T-handle, allowing the unit to slide on the loader.
- As the unit stops sliding on the loader, it will pivot on the loader to an upright position.
- Gradually counterbalance the unit’s weight by applying an upward force on the T-handle. This allows the unit to settle gently on the wheels, avoiding undue impact on the unit.
- Return the T-handle to the stored position, making sure that the locking pin engages the T-handle.
Note: For DC models, replace the battery and reconnect the battery box plug, making certain it is fully engaged.
For more information on your Snorkel lift, visit Snorkel Support.